Make a Movies App Using TMDb API in Kotlin Part 3 - Movie List Using Retrofit and Glide
Feature #1: As a user, I want to see a list of movies so that I can browse through different movies
For offline viewing, get the eBook (PDF & ePUB) version + source code here.
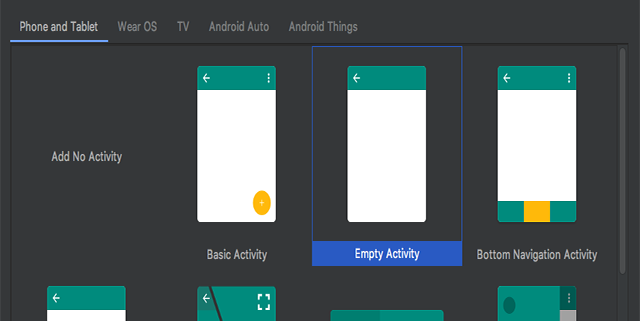
Create a New Project
-
Open Android Studio and start a new project.
-
Select Empty Activity.
-
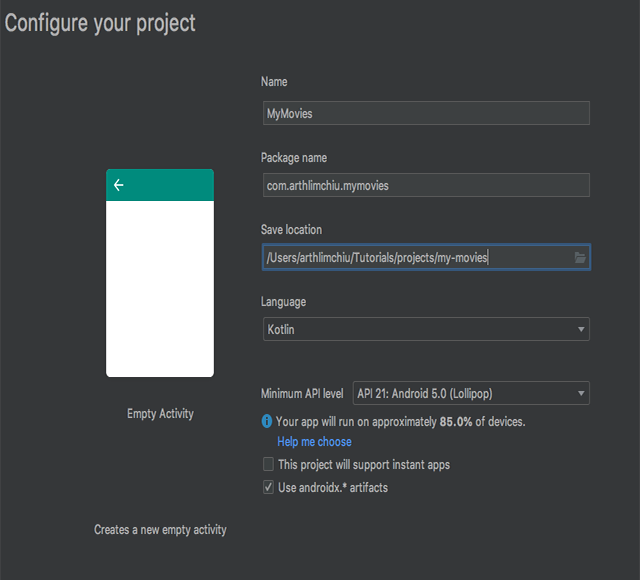
You can name the app whatever you want.
-
For this project, we set our minimum API level to 21.
-
Make sure androidx.* artifacts is checked and click Finish.
Import Dependencies
After it’s done building, open your app-level build.gradle and add these dependencies:
apply plugin: 'com.android.application'
apply plugin: 'kotlin-android'
apply plugin: 'kotlin-kapt'

android {
    compileSdkVersion 28
    defaultConfig {
        applicationId "com.arthlimchiu.mymovies"
        minSdkVersion 21
        targetSdkVersion 28
        versionCode 1
        versionName "1.0"
        testInstrumentationRunner "androidx.test.runner.AndroidJUnitRunner"
    }
    buildTypes {
        release {
            minifyEnabled false
            proguardFiles getDefaultProguardFile('proguard-android-optimize.txt'), 'proguard-rules.pro'
        }
    }
}

dependencies {
    implementation fileTree(dir: 'libs', include: ['*.jar'])

    // Kotlin
    implementation"org.jetbrains.kotlin:kotlin-stdlib-jdk7:$kotlin_version"

    // Support
    // https://developer.android.com/jetpack/androidx/versions
    implementation 'androidx.appcompat:appcompat:1.1.0'
    implementation 'androidx.constraintlayout:constraintlayout:1.1.3'
    implementation 'androidx.recyclerview:recyclerview:1.0.0'
    implementation 'androidx.cardview:cardview:1.0.0'

    // ViewModel and LiveData
    // https://developer.android.com/jetpack/androidx/releases/lifecycle
    implementation "androidx.lifecycle:lifecycle-extensions:2.1.0"

    // Retrofit
    // https://github.com/square/retrofit
    implementation 'com.squareup.retrofit2:retrofit:2.6.1'
    implementation 'com.squareup.retrofit2:converter-gson:2.6.1'

    // Gson
    // https://github.com/google/gson
    implementation 'com.google.code.gson:gson:2.8.5'

    // Glide
    // https://github.com/bumptech/glide
    implementation 'com.github.bumptech.glide:glide:4.10.0'
    kapt 'com.github.bumptech.glide:compiler:4.10.0'

    // Testing
    testImplementation 'junit:junit:4.12'
    androidTestImplementation 'androidx.test:runner:1.2.0'
    androidTestImplementation 'androidx.test.espresso:espresso-core:3.2.0'
}
As of this writing, those are the latest versions. Make sure to check the latest version of each dependency from the links provided.
Click Sync Now at the top right corner and we’re done setting up our project.
Project Resources
Open your strings.xml and add these strings.
<resources>
    <string name="app_name">MyMovies</string>
    <string name="popular">Popular</string>
    <string name="most_popular_movies">Most popular movies</string>
    <string name="error_fetch_movies">Please check your internet connection</string>
    <string name="top_rated">Top Rated</string>
    <string name="highest_rated_movies">Highest rated movies of all time</string>
    <string name="upcoming">Upcoming</string>
    <string name="stay_updated">Stay updated with the latest movies</string>
</resources>
Open your colors.xml and change the colors.
<resources>
    <color name="colorPrimary">#212121</color>
    <color name="colorPrimaryDark">#000000</color>
    <color name="colorAccent">#FF5252</color>
</resources>
Open your styles.xml and change the AppTheme to Theme.AppCompat.
<resources>
    <!-- Base application theme. -->
    <style name="AppTheme" parent="Theme.AppCompat">
        <!-- Customize your theme here. -->
        <item name="colorPrimary">@color/colorPrimary</item>
        <item name="colorPrimaryDark">@color/colorPrimaryDark</item>
        <item name="colorAccent">@color/colorAccent</item>
    </style>
</resources>
Fetch Movies from TMDb API Using Retrofit
In this section, we will use Retrofit to connect to TMDb’s API.
-
Add INTERNET permission in AndroidManifest.xml
<manifest xmlns:android="http://schemas.android.com/apk/res/android" package="com.arthlimchiu.mymovies"> <uses-permission android:name="android.permission.INTERNET" /> <application ... </application> </manifest> -
Create a new data class called Movie.
data class Movie( @SerializedName("id") val id: Long, @SerializedName("title") val title: String, @SerializedName("overview") val overview: String, @SerializedName("poster_path") val posterPath: String, @SerializedName("backdrop_path") val backdropPath: String, @SerializedName("vote_average") val rating: Float, @SerializedName("release_date") val releaseDate: String ) -
Create a new data class called GetMoviesResponse.
data class GetMoviesResponse( @SerializedName("page") val page: Int, @SerializedName("results") val movies: List<Movie>, @SerializedName("total_pages") val pages: Int ) -
Create a new interface called Api.
 interface Api {

     @GET("movie/popular")
     fun getPopularMovies(
         @Query("api_key") apiKey: String = "YOUR_API_KEY_HERE",
         @Query("page") page: Int
     ): Call<GetMoviesResponse>
 }
Be sure to replace YOUR_API_KEY_HERE with your own API key that you generated from the previous chapter.
-
Create a new object called MoviesRepository.
 object MoviesRepository {

     private val api: Api

     init {
         val retrofit = Retrofit.Builder()
             .baseUrl("https://api.themoviedb.org/3/")
             .addConverterFactory(GsonConverterFactory.create())
             .build()

         api = retrofit.create(Api::class.java)
     }
 }
Take note that it uses the
objectkeyword of Kotlin which is an easy way to declare a Singleton in Kotlin.Using the
initblock of Kotlin which is called when an instance is initialized, we instantiate a Retrofit instance using it’s builder. Then, instantiate an instance of Api using the Retrofit instance. -
Add a new method in MoviesRepository called
getPopularMovies().object MoviesRepository { ... fun getPopularMovies(page: Int = 1) { api.getPopularMovies(page = page) .enqueue(object : Callback<GetMoviesResponse> { override fun onResponse( call: Call<GetMoviesResponse>, response: Response<GetMoviesResponse> ) { if (response.isSuccessful) { val responseBody = response.body() if (responseBody != null) { Log.d("Repository", "Movies: ${responseBody.movies}") } else { Log.d("Repository", "Failed to get response") } } } override fun onFailure(call: Call<GetMoviesResponse>, t: Throwable) { Log.e("Repository", "onFailure", t) } }) } }For now, we default the
pageto 1. We will deal with pagination later on.First of, we execute
api.getPopularMovies()asynchronously using the.enqueue()method. Then, we log the movies if the response was successful. -
Open your MainActivity and call the
getPopularMovies()method of MoviesRepository.class MainActivity : AppCompatActivity() { override fun onCreate(savedInstanceState: Bundle?) { super.onCreate(savedInstanceState) setContentView(R.layout.activity_main) MoviesRepository.getPopularMovies() } } -
Run the app and check your Logcat.

It should log the movies list from the response. Type Repository to easily find the log.
Callbacks Using Kotlin’s Higher-Order Functions
In Java, we’re used to creating an interface to represent callbacks in our code like this:
public interface OnGetMoviesCallback {

    void onSuccess(List<Movie> movies);

    void onError();
}
In Kotlin, we no longer need to do that because we can pass a function to another function and we call it in Kotlin - higher-order functions. Let’s take a closer look.
-
Open your MoviesRepository and let’s refactor
getPopularMovies().fun getPopularMovies( page: Int = 1, onSuccess: (movies: List<Movie>) -> Unit, onError: () -> Unit ) { ... }onSuccessis a parameter that is a function that doesn’t return anything-> Unitbut it accepts a list of movies.onErroris the same with onSuccess but it doesn’t accept anything. All we need to is to just invoke this method.How do we use it?
-
In your
getPopularMovies()method, remove the logs and replace it invocations of the functions.fun getPopularMovies( page: Int = 1, onSuccess: (movies: List<Movie>) -> Unit, onError: () -> Unit ) { api.getPopularMovies(page = page) .enqueue(object : Callback<GetMoviesResponse> { override fun onResponse( call: Call<GetMoviesResponse>, response: Response<GetMoviesResponse> ) { if (response.isSuccessful) { val responseBody = response.body() if (responseBody != null) { onSuccess.invoke(responseBody.movies) } else { onError.invoke() } } else { onError.invoke() } } override fun onFailure(call: Call<GetMoviesResponse>, t: Throwable) { onError.invoke() } }) }invoke()is how you execute a higher-order function. Take note that it will vary depending if the higher-order function has parameter(s) or not. You can see the difference by comparingonSuccess.invoke(responseBody.movies)andonError.invoke().onSuccess: (movies: List<Movie>) -> Unitis toonSuccess.invoke(responseBody.movies).onError: () -> Unitis toonError.invoke(). -
Open your MainActivity and let’s pass the functions needed by
getPopularMovies().class MainActivity : AppCompatActivity() { override fun onCreate(savedInstanceState: Bundle?) { super.onCreate(savedInstanceState) setContentView(R.layout.activity_main) MoviesRepository.getPopularMovies( onSuccess = ::onPopularMoviesFetched, onError = ::onError ) } private fun onPopularMoviesFetched(movies: List<Movie>) { Log.d("MainActivity", "Movies: $movies") } private fun onError() { Toast.makeText(this, getString(R.string.error_fetch_movies), Toast.LENGTH_SHORT).show() } }The
::colon operator is used to create a class or function reference. An alternative is doing this:MoviesRepository.getPopularMovies( onSuccess = { movies -> Log.d("MainActivity", "Movies: $movies") }, onError = { Toast.makeText(this, getString(R.string.error_fetch_movies), Toast.LENGTH_SHORT).show() } )But using the
::operator approach just make things much cleaner. However, I leave it to your preference on which approach you want. -
Run the app, check your Logcat and be sure to type MainActivity in the search bar to filter the logs. You should see a log that is the same as the previous section.
If you’d like to know more about Kotlin’s higher-order functions. Check out the documentation.
Create a Horizonal List and Load Images Using Glide
Now that we can finally fetch movies from TMDb, it’s time to show these movies to your UI.
-
Open your activity_main.xml and add a RecyclerView for popular movies.
<?xml version="1.0" encoding="utf-8"?> <LinearLayout xmlns:android="http://schemas.android.com/apk/res/android" android:layout_width="match_parent" android:layout_height="match_parent" android:orientation="vertical"> <TextView android:layout_width="match_parent" android:layout_height="wrap_content" android:layout_marginStart="16dp" android:layout_marginTop="16dp" android:layout_marginEnd="16dp" android:text="@string/popular" android:textColor="@android:color/white" android:textSize="18sp" android:textStyle="bold" /> <TextView android:layout_width="match_parent" android:layout_height="wrap_content" android:layout_marginStart="16dp" android:layout_marginEnd="16dp" android:text="@string/most_popular_movies" /> <androidx.recyclerview.widget.RecyclerView android:id="@+id/popular_movies" android:layout_width="match_parent" android:layout_height="wrap_content" android:layout_marginTop="8dp" android:clipToPadding="false" android:paddingStart="16dp" android:paddingEnd="16dp" /> </LinearLayout> -
Under res->layout folder, create a new layout called item_movie.xml.
<androidx.cardview.widget.CardView xmlns:android="http://schemas.android.com/apk/res/android" xmlns:app="http://schemas.android.com/apk/res-auto" android:layout_width="128dp" android:layout_height="172dp" android:layout_marginEnd="8dp" app:cardCornerRadius="4dp"> <ImageView android:id="@+id/item_movie_poster" android:layout_width="match_parent" android:layout_height="match_parent" /> </androidx.cardview.widget.CardView> -
Create a new class called MoviesAdapter.
class MoviesAdapter( private var movies: List<Movie> ) : RecyclerView.Adapter<MoviesAdapter.MovieViewHolder>() { override fun onCreateViewHolder(parent: ViewGroup, viewType: Int): MovieViewHolder { val view = LayoutInflater .from(parent.context) .inflate(R.layout.item_movie, parent, false) return MovieViewHolder(view) } override fun getItemCount(): Int = movies.size override fun onBindViewHolder(holder: MovieViewHolder, position: Int) { holder.bind(movies[position]) } fun updateMovies(movies: List<Movie>) { this.movies = movies notifyDataSetChanged() } inner class MovieViewHolder(itemView: View) : RecyclerView.ViewHolder(itemView) { private val poster: ImageView = itemView.findViewById(R.id.item_movie_poster) fun bind(movie: Movie) { Glide.with(itemView) .load("https://image.tmdb.org/t/p/w342${movie.posterPath}") .transform(CenterCrop()) .into(poster) } } }.load("https://image.tmdb.org/t/p/w342/<poster_url>")is how you fetch a poster of a movie from TMDb. You can learn more about fetching images from TMDb here.Available poster sizes are:
- w92
- w154
- w185
- w342
- w500
- w780
- original
You can go for original if you want to have the highest quality image but it will take time to load. A size of w342 should be enough for most screens.
-
Open your MainActivity and instantiate your RecyclerView and Adapter.
class MainActivity : AppCompatActivity() { private lateinit var popularMovies: RecyclerView private lateinit var popularMoviesAdapter: MoviesAdapter override fun onCreate(savedInstanceState: Bundle?) { super.onCreate(savedInstanceState) setContentView(R.layout.activity_main) popularMovies = findViewById(R.id.popular_movies) popularMovies.layoutManager = LinearLayoutManager( this, LinearLayoutManager.HORIZONTAL, false ) popularMoviesAdapter = MoviesAdapter(listOf()) popularMovies.adapter = popularMoviesAdapter MoviesRepository.getPopularMovies( onSuccess = ::onPopularMoviesFetched, onError = ::onError ) } private fun onPopularMoviesFetched(movies: List<Movie>) { popularMoviesAdapter.updateMovies(movies) } ... }To make a horizontal list in RecyclerView, just provide the LinearLayoutManager with an orientation and a boolean flag that reverses the list or not.
popularMovies.layoutManager = LinearLayoutManager( this, LinearLayoutManager.HORIZONTAL, false )We removed the log in
onPopularMoviesFetched()and replaced it by updating the movies inside popularMoviesAdapter.private fun onPopularMoviesFetched(movies: List<Movie>) { popularMoviesAdapter.updateMovies(movies) } -
Run the app. Scroll through the list and take a moment to enjoy your work because you deserve it.
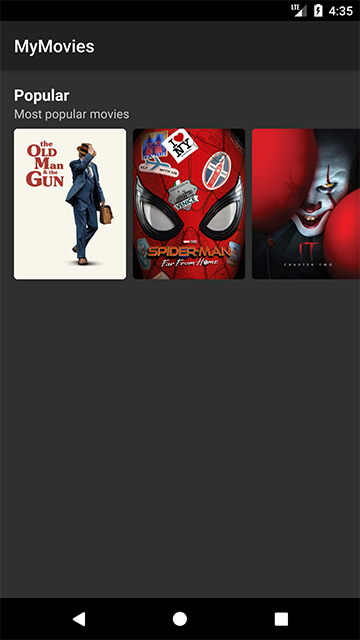
As of this writing, these are the most popular movies. We might not have the same list by the time you’ve finished this section.
Pagination
While you’re scrolling through the list, you’ll notice that you only see a limited number of movies. Specifically, you only see 20 movies. Why is that?
TMDb has thousands and thousands of movies in their database. Imagine sending all those data into one API call. It would take a lot of time to receive the response and also the size of the response would be super big which is not ideal and efficient. Especially, when most of the time the user won’t scroll all of it. That’s why they paginate their movies API.
Open Api and you’ll see a page parameter.
interface Api {
@GET("movie/popular")
fun getPopularMovies(
@Query("api_key") apiKey: String = "YOUR_API_KEY_HERE",
@Query("page") page: Int
): Call<GetMoviesResponse>
}
For now, in our MoviesRepository we default the page to 1.
object MoviesRepository {
...
 fun getPopularMovies(
         page: Int = 1,
         onSuccess: (movies: List<Movie>) -> Unit,
         onError: () -> Unit
     ) {
         ...
     }
In this section, our goal is to fetch the next page of movies when the user scrolls halfway through our list.
-
Open your MoviesAdapter, change the type of the
moviesvariable toMutableList, and rename yourupdateMovies()method toappendMovies().class MoviesAdapter( private var movies: MutableList<Movie> ) : RecyclerView.Adapter<MoviesAdapter.MovieViewHolder>() { ... fun appendMovies(movies: List<Movie>) { this.movies.addAll(movies) notifyItemRangeInserted( this.movies.size, movies.size - 1 ) } ... }We changed the type of the
moviesvariable toMutableListbecause we now have a dynamic list of movies.class MoviesAdapter( private var movies: MutableList<Movie> ) : ...Instead of using
notifyDataSetChanged(), we usenotifyItemRangeInserted()because we don’t want to refresh the whole list. We just want to notify that there are new items added from this start and end positions.fun appendMovies(movies: List<Movie>) { this.movies.addAll(movies) notifyItemRangeInserted( this.movies.size, movies.size - 1 ) } -
Open your MainActivity and declare a member variable for our page and LinearLayoutManager.
class MainActivity : AppCompatActivity() { private lateinit var popularMovies: RecyclerView private lateinit var popularMoviesAdapter: MoviesAdapter private lateinit var popularMoviesLayoutMgr: LinearLayoutManager private var popularMoviesPage = 1 ... } -
In
onCreate(), instantiatepopularMoviesLayoutMgrvariable, assign it topopularMoviesRecyclerView, passpopularMoviesPagetoMoviesRepository.getPopularMovies(), and an emptyMutableListin MoviesAdapter.override fun onCreate(savedInstanceState: Bundle?) { super.onCreate(savedInstanceState) setContentView(R.layout.activity_main) popularMovies = findViewById(R.id.popular_movies) popularMoviesLayoutMgr = LinearLayoutManager( this, LinearLayoutManager.HORIZONTAL, false ) popularMovies.layoutManager = popularMoviesLayoutMgr popularMoviesAdapter = MoviesAdapter(mutableListOf()) popularMovies.adapter = popularMoviesAdapter MoviesRepository.getPopularMovies( popularMoviesPage, ::onPopularMoviesFetched, ::onError ) } -
Create a new method called
getPopularMovies().private fun getPopularMovies() { MoviesRepository.getPopularMovies( popularMoviesPage, ::onPopularMoviesFetched, ::onError ) } -
Use
getPopularMovies()inonCreate().override fun onCreate(savedInstanceState: Bundle?) { ... popularMovies.layoutManager = popularMoviesLayoutMgr popularMoviesAdapter = MoviesAdapter(mutableListOf()) popularMovies.adapter = popularMoviesAdapter getPopularMovies() } -
Create a new method called
attachPopularMoviesOnScrollListener().private fun attachPopularMoviesOnScrollListener() { popularMovies.addOnScrollListener(object : RecyclerView.OnScrollListener() { override fun onScrolled(recyclerView: RecyclerView, dx: Int, dy: Int) { val totalItemCount = popularMoviesLayoutMgr.itemCount val visibleItemCount = popularMoviesLayoutMgr.childCount val firstVisibleItem = popularMoviesLayoutMgr.findFirstVisibleItemPosition() if (firstVisibleItem + visibleItemCount >= totalItemCount / 2) { popularMovies.removeOnScrollListener(this) popularMoviesPage++ getPopularMovies() } } }) }Let’s go over the code bit by bit. The first three variables are:
totalItemCount- the total number of movies inside our popularMoviesAdapter. This will keep increasing the more we call popularMoviesAdapter.appendMovies().visibleItemCount- the current number of child views attached to the RecyclerView that are currently being recycled over and over again. The value of this variable for common screen sizes will range roughly around 4-5 which are 3 visible views, +1 left view that’s not seen yet and +1 right view that’s not seen yet also. The value will be higher if you have a bigger screen.firstVisibleItem- is the position of the leftmost visible item in our list.
The condition will be true if the user has scrolled past halfway plus a buffered value of visibleItemCount.
 if (firstVisibleItem + visibleItemCount >= totalItemCount / 2) {
     ...
 }
After condition is met, we disable the scroll listener since we only want this code to run once. Next, we increment
popularMoviesPageand then callgetPopularMovies().if (firstVisibleItem + visibleItemCount >= totalItemCount / 2) { popularMovies.removeOnScrollListener(this) popularMoviesPage++ getPopularMovies() } -
In
onPopularMoviesFetched()method, call the newly renamedappendMovies()method and reattach the OnScrollListener again.private fun onPopularMoviesFetched(movies: List<Movie>) { popularMoviesAdapter.appendMovies(movies) attachPopularMoviesOnScrollListener() }When the user has scrolled past halfway, detach the OnScrollListener and then after the new movies have been fetched reattach it again. The complete MainActivity code should like this:
class MainActivity : AppCompatActivity() { private lateinit var popularMovies: RecyclerView private lateinit var popularMoviesAdapter: MoviesAdapter private lateinit var popularMoviesLayoutMgr: LinearLayoutManager private var popularMoviesPage = 1 override fun onCreate(savedInstanceState: Bundle?) { ... popularMovies = findViewById(R.id.popular_movies) popularMoviesLayoutMgr = LinearLayoutManager( this, LinearLayoutManager.HORIZONTAL, false ) popularMovies.layoutManager = popularMoviesLayoutMgr popularMoviesAdapter = MoviesAdapter(mutableListOf()) popularMovies.adapter = popularMoviesAdapter getPopularMovies() } private fun getPopularMovies() { MoviesRepository.getPopularMovies( popularMoviesPage, ::onPopularMoviesFetched, ::onError ) } private fun onPopularMoviesFetched(movies: List<Movie>) { popularMoviesAdapter.appendMovies(movies) attachPopularMoviesOnScrollListener() } private fun attachPopularMoviesOnScrollListener() { popularMovies.addOnScrollListener(object : RecyclerView.OnScrollListener() { override fun onScrolled(recyclerView: RecyclerView, dx: Int, dy: Int) { val totalItemCount = popularMoviesLayoutMgr.itemCount val visibleItemCount = popularMoviesLayoutMgr.childCount val firstVisibleItem = popularMoviesLayoutMgr.findFirstVisibleItemPosition() if (firstVisibleItem + visibleItemCount >= totalItemCount / 2) { popularMovies.removeOnScrollListener(this) popularMoviesPage++ getPopularMovies() } } }) } ... } -
Run the app. Keep scrolling and you’ll notice that it now fetches a new batch of movies. Good job!
If you want to know why we detach and reattach a scroll listener, comment out
popularMovies.removeOnScrollListener(this)and replace it withLog.d("MainActivity", "Fetching movies")and you’ll see how many times you’re fetching the movies.
Now that we have the logic for fetching the movies. Let’s categorize the movies. Head over to Part 4 - Popular, Top Rated, and Upcoming Movies.

Do You Want to Become Really Good at Android Development?
Here are 7 ways to do it👇